Drop-in buttons make it easy to integrate specific payment brands into your app with minimal effort. They offer an fast checkout flow, reducing steps and improving user experience. Merchants should use them for fast, brand-specific integration without custom development.
Ideal for apps with single payment brand or those adding new brands quickly. The best way to enable trusted payment options and boost conversion rates.
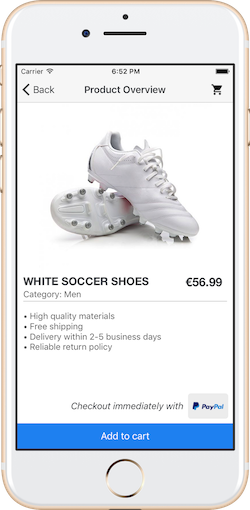
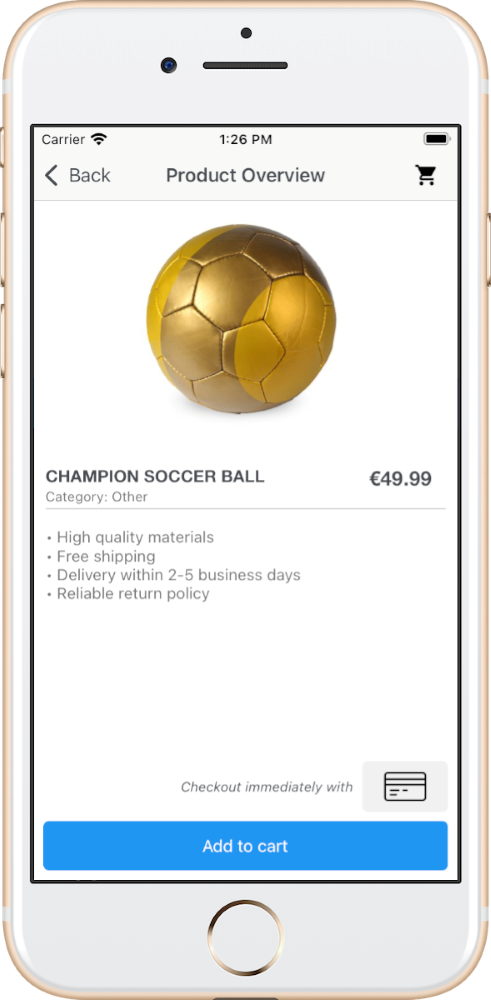
The easiest way to create payment button is to add it in Interface Builder. Payment button needs only payment brand to be set to automatically display appropriate logo. You can set your own logo for the button and do all necessary customizations as well.
Drag-n-drop standard button to the view and set class OPPPaymentButton on Identity Inspector tab.
Create an outlet for the button in your view controller.
NOTE: Do the image customization before setting a payment brand. Otherwise your image might be overwritten by a default brand logo.
Card payment button
Payment button can be used as card payment button irrespective of card brands. Payment brand will be detected based on card number. Payment brand need to be set as "CARD" for card payment button. Brand detection will be supported only for payment brands sent in CheckoutSettings.
self.paymentButton.paymentBrand = @"CARD";
self.paymentButton.paymentBrand = "CARD"
NOTE: Merchants are not restricted to the predefined method for creating a payment button. They can design their own payment options screen using this fast integration approach. The mSDK will simply expect the correct payment details to initiate the payment flow when the merchant’s button action is triggered.
Implement button action method
Firstly add an action method to your view controller. In code sample you can see main steps that should be implemented in this method.
- (IBAction)paymentButtonAction:(id)sender {
    // button will be used to get payment brand
    OPPPaymentButton *button = (OPPPaymentButton *)sender;

    // request checkout ID from your server
    // configure OPPCheckoutProvider
    // present checkout for specific payment brand and implement callbacks
}
@IBAction func paymentButtonAction(_ sender: Any) {
    // button will be used to get payment brand
    let button = sender as! OPPPaymentButton

    // request checkout ID from your server
    // configure OPPCheckoutProvider
    // present checkout for specific payment brand and implement callbacks
}
Request checkout ID
To initiate payment checkout ID should be created. Your app should request a checkout ID from your server. This example uses our sample integration server; please adapt it to use your own backend API.
let provider = OPPPaymentProvider(mode: OPPProviderMode.test)

let checkoutSettings = OPPCheckoutSettings()
checkoutSettings.paymentBrands = ["VISA"]
checkoutSettings.shopperResultURL = "com.companyname.appname.payments://result"
let checkoutProvider = OPPCheckoutProvider(paymentProvider: provider, checkoutID: checkoutID!, settings: checkoutSettings)
NOTE: For some payment brands no additional user info in app is required, shopper will be directly redirected to the issuer web page (e.g. PayPal). In this case you don't need to create checkout settings.
Tokenization
The mSDK checkout page can display stored token for selected payment brand. Add the additional parameter to the normal prepare checkout requesteg: "registrations[0].id" = "Shoppers_Token_Value". Your server should send shoppers' tokens along with other configuration data such as amount, currency, order type and etc.
NOTE: mSDK automatically displays the first token for selected payment brand.
Present checkout and implement callbacks
Present checkout for specific payment brand using OPPCheckoutProvider API.
Type of the first presented screen depends on payment brand:
Payment form (Credit cards). If the shopper has stored tokens for selected payment brand the first of them will be displayed on the screen.
[checkoutProvider presentCheckoutWithPaymentBrand:button.paymentBrand
  loadingHandler:^(BOOL inProgress) {
    // Executed whenever SDK sends request to the server or receives the response.
    // You can start or stop loading animation based on inProgress parameter.
} completionHandler:^(OPPTransaction * _Nullable transaction, NSError * _Nullable error) {
   if (transaction.type == OPPTransactionTypeAsynchronous) {
        // Open transaction.redirectURL in Safari browser to complete the transaction
   }  else if (transaction.type == OPPTransactionTypeSynchronous) {
       // Send request to your server to obtain transaction status

       if (transaction.resourcePath) {
          // Get the payment status using the resourcePath.
       }
   }
} cancelHandler:^{
    // Executed if the shopper closes the payment page prematurely.
}];
checkoutProvider?.presentCheckout(withPaymentBrand: button.paymentBrand,
   loadingHandler: { (inProgress) in
    // Executed whenever SDK sends request to the server or receives the answer.
    // You can start or stop loading animation based on inProgress parameter.
}, completionHandler: { (transaction, error) in
    if transaction.type == .asynchronous {
         // Open transaction.redirectURL in Safari browser to complete the transaction
    } else if transaction.type == .synchronous {
        // Send request to your server to obtain transaction status
        if transaction.resourcePath {
           // Get the payment status using the resourcePath.

        }
    }
}, cancelHandler: {
    // Executed if the shopper closes the payment page prematurely.
})
Get the Payment Status
Finally your app should request the payment status from your server (again, adapt this example to your own setup). Based on chosen approach you will have to send checkout Id or resource path to your server.
let provider = OPPPaymentProvider(mode: OPPProviderMode.live)
3. Change your backend to use the correct API endpoints and credentials.
Create payment button
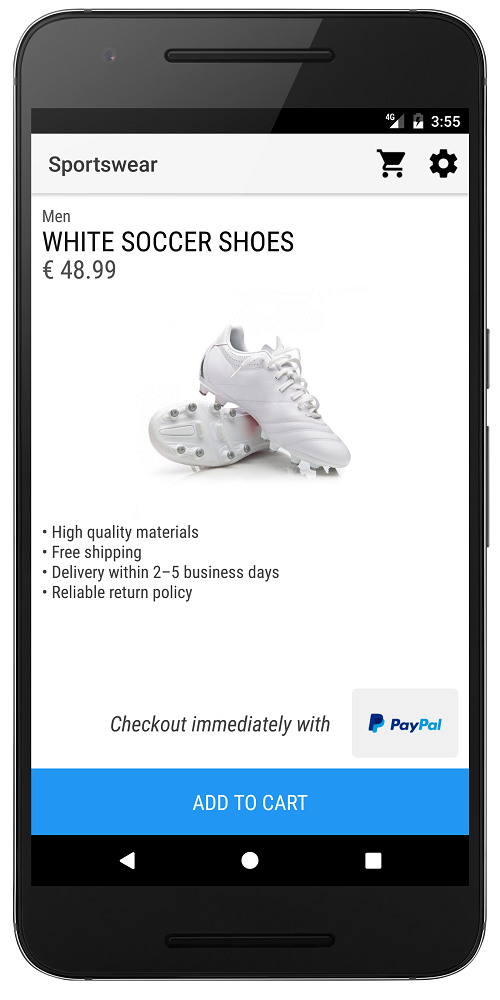
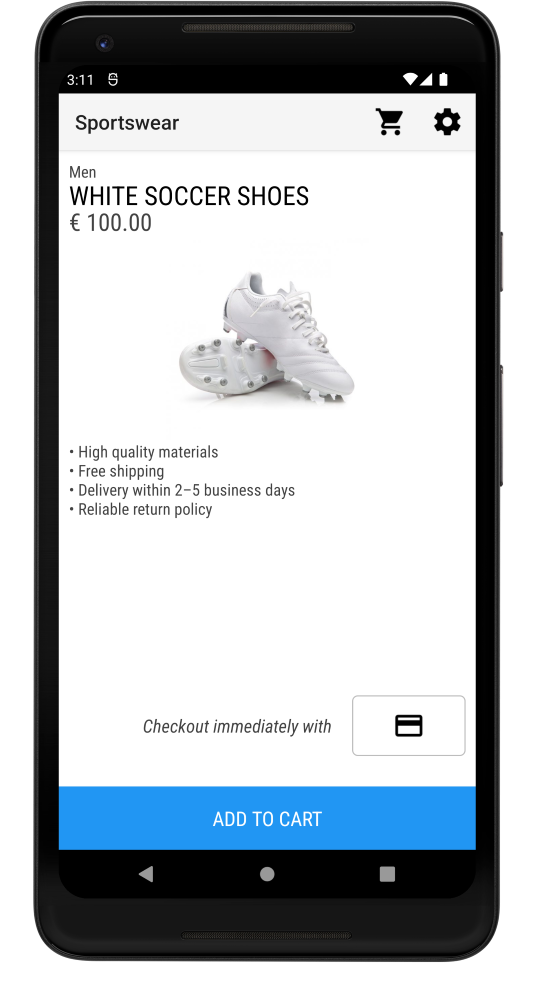
The easiest way to create payment button is to add it in your layout's xml. Payment button needs only payment brand to be set to automatically display appropriate logo. You can set your own logo for the button and do all necessary customizations as well.
Add PaymentButtonFragment to your activity. You can do it in two ways:
Declare it inside the activity's layout file
val paymentButtonFragment = supportFragmentManager.findFragmentById(
        R.id.payment_button_fragment) as PaymentButtonFragment
Or, programmatically add the fragment to an existing ViewGroup
PaymentButtonFragment paymentButtonFragment = new PaymentButtonFragment();
getSupportFragmentManager()
        .beginTransaction()
        .add(R.id.payment_button_fragment, paymentButtonFragment)
        .commit();
val paymentButtonFragment = PaymentButtonFragment()
supportFragmentManager.beginTransaction()
        .add(R.id.payment_button_fragment, paymentButtonFragment)
        .commit()
Set payment brand and add OnClickListener
paymentButtonFragment.setPaymentBrand("PAYPAL");
paymentButtonFragment.getPaymentButton().setOnClickListener(new View.OnClickListener() {
    @Override
    public void onClick(View v) {
        /* request new checkout id */
    }
});
paymentButtonFragment.paymentBrand = "PAYPAL"
paymentButtonFragment.paymentButton.setOnClickListener {
    /* request new checkout id */
}
NOTE: If Google Pay used as a payment option add this before payment brand is set: paymentButtonFragment.setPaymentButtonIntegrationMode(PaymentButtonIntegrationMode.PAYMENT_OPTION)
Payment button can be used as card payment button irrespective of card brands. Payment brand will be detected based on card number. Payment brand need to be set as "CARD" for card payment button. Brand detection will be supported only for payment brands sent in CheckoutSettings.
paymentButtonFragment.setPaymentBrand("CARD");
paymentButtonFragment.paymentBrand = "CARD"
Tokenization
The mSDK checkout page can display stored token for selected payment brand. Add the additional parameter to the normal prepare checkout request. Your server should send shoppers' tokens along with other configuration data such as amount, currency, order type and etc.
NOTE: mSDK automatically displays the first token for selected payment brand.
Request Checkout ID
Your app should request a checkout ID from your server. This example uses our sample integration server; please adapt it to use your own backend API.
fun requestCheckoutId(): String? {
val url: URL
var connection: HttpURLConnection? = null
var checkoutId: String? = null
val urlString = YOUR_URL.toString() + "?amount=48.99¤cy=EUR&paymentType=DB"
try {
url = URL(urlString)
connection = url.openConnection() as HttpURLConnection
val reader = JsonReader(InputStreamReader(connection.inputStream, "UTF-8"))
reader.beginObject()
while (reader.hasNext()) {
if (reader.nextName() == "checkoutId") {
checkoutId = reader.nextString()
break
}
}
reader.endObject()
reader.close()
} catch (e: Exception) {
/* error occurred */
} finally {
connection?.disconnect()
}
return checkoutId
}
Submit transaction
Create CheckoutSettings. You can configure the payment brands in the checkoutSettings the shopper can also use for payment in addition to the payment brand set in the setPaymentBrand method:
Set<String> paymentBrands = new LinkedHashSet<String>();

paymentBrands.add("VISA");
paymentBrands.add("MASTER");

CheckoutSettings checkoutSettings = new CheckoutSettings(checkoutId, paymentBrands, Connect.ProviderMode.TEST);
// since mSDK version 6.0.0 the shopper result URL is not required
checkoutSettings.setShopperResultUrl("companyname://result");
val paymentBrands = hashSetOf("VISA", "MASTER")

val checkoutSettings = CheckoutSettings(checkoutId, paymentBrands, Connect.ProviderMode.TEST)
// since mSDK version 6.0.0 the shopper result URL is not required
checkoutSettings.shopperResultUrl = "companyname://result"
Or leave it empty:
CheckoutSettings checkoutSettings = new CheckoutSettings(checkoutId, null, Connect.ProviderMode.TEST);
val checkoutSettings = CheckoutSettings(checkoutId, null, Connect.ProviderMode.TEST)
Submit transaction and handle CheckoutActivityResult.
public class MainActivity extends AppCompatActivity {

    private final ActivityResultLauncher checkoutLauncher = registerForActivityResult(
        new CheckoutActivityResultContract(),
        this::handleCheckoutResult
    );

    private void submitTransaction() {
        try {
            // set the ActivityResultLauncher to handle CheckoutActivityResult
            paymentButtonFragment.setActivityResultLauncher(checkoutLauncher);
            paymentButtonFragment.submitTransaction(checkoutSettings);
        } catch (PaymentException e) {
            // error occurred
        }
    }

    private void handleCheckoutResult(@NonNull CheckoutActivityResult result) {
        if (result.isCanceled()) {
            // shopper cancelled the checkout process
            return;
        }

        String resourcePath = result.getResourcePath();

        if (resourcePath != null) {
            // request payment status using the resourcePath
        }
    }
}
class MainActivity : AppCompatActivity() {

    private val checkoutLauncher = registerForActivityResult(CheckoutActivityResultContract()) {
        result: CheckoutActivityResult -> handleCheckoutResult(result)
    }

    private fun submitTransaction() {
        try {
            // set the ActivityResultLauncher to handle CheckoutActivityResult
            paymentButtonFragment.setActivityResultLauncher(checkoutLauncher)
            paymentButtonFragment.submitTransaction(checkoutSettings)
        } catch (e: PaymentException) {
             // error occurred
        }
    }

    private fun handleCheckoutResult(result: CheckoutActivityResult) {
        if (result.isCanceled) {
            // shopper cancelled the checkout process
            return
        }

        val resourcePath = result.resourcePath

        if (resourcePath != null) {
            // request payment status using the resourcePath
        }
    }
}
For ASYNC transaction also override onNewIntent method of your activity
@Override
protected void onNewIntent(Intent intent) {
    super.onNewIntent(intent);

    if (intent.getScheme().equals("YOUR_SCHEME")) {
        /* request payment status */
    }
}
override fun onNewIntent(intent: Intent) {
    super.onNewIntent(intent)

    if (intent.scheme == "YOUR_SCHEME") {
        /* request payment status */
    }
}
[Optional] Receiving callbacks during checkout process
msdk provides you the callback, before the payment is submitted. You will get more details about how to implement CALLBACK here.
You need to use OnBeforeSubmitCallback interface to listen to callbacks, consider below code snippet for reference
public class CheckoutOnBeforeSubmitListener implements OnBeforeSubmitCallback {
    @Override
    public void onBeforeSubmit(@NonNull PaymentDetails paymentDetails, @NonNull Listener callback) {

    }
}
class CheckoutOnBeforeSubmitListener : OnBeforeSubmitCallback {
    override fun onBeforeSubmit(paymentDetails: PaymentDetails, callback: Listener) {

    }
}
Request Payment Status
Finally your app should request the payment status from your server (adapt this example to your own setup). Based on chosen approach you will have to send checkout Id or resource path to your server.
fun requestPaymentStatus(): String? {
    val url: URL
    var connection: HttpURLConnection? = null
    var paymentStatus: String? = null

    val urlString = YOUR_URL.toString() + "/paymentStatus?resourcePath=" + URLEncoder.encode(RESOURCE_PATH, "UTF-8")

    try {
    url = URL(urlString)
        connection = url.openConnection() as HttpURLConnection

        val jsonReader = JsonReader(InputStreamReader(connection.inputStream, "UTF-8"))
        jsonReader.beginObject()

        while (jsonReader.hasNext()) {
            if (jsonReader.nextName() == "paymentResult") {
                paymentStatus = jsonReader.nextString()

                break
            }
        }

        jsonReader.endObject()
        jsonReader.close()
    } catch (e: Exception) {
        /* error occurred */
    } finally {
        connection?.disconnect()
    }

    return paymentStatus
}
Testing
The sandbox environment only accepts test payment parameters.
You can find test values for credit cards and bank accounts in our Testing Guide.
Go to Production
1. Talk to your account manager to get the live credentials.
2. Adjust the server type to LIVE in your initialization of CheckoutSettings.
CheckoutSettings checkoutSettings = new CheckoutSettings(checkoutId, paymentBrands, Connect.ProviderMode.LIVE);
val checkoutSettings = CheckoutSettings(checkoutId, paymentBrand, Connect.ProviderMode.LIVE)
3. Change your backend to use the correct API endpoints and credentials.
Apple Pay Button Types
Several Apple Pay button types and styles are provided that you can use in your app. Beginning in iOS 14 and macOS 11, you can use the automatic style to let the current system appearance determine the appearance of the Apple Pay buttons in your app. Apple Pay button type can be customised with checkoutSettings.applePayType property but only to checkout payment selection screen and not the payment button integration.
The Apple Pay button type "continue" is supported for the iOS 15 and above.
//Apple Pay button type is set to Buy
checkoutSettings.applePayType = PKPaymentButtonTypeBuy;
//Apple Pay button type is set to Buy
checkoutSettings.applePayType = PKPaymentButtonType.buy