Processing Account Configuration
The Account Tree is a core navigation and management component of the Merchant Portal. It provides a hierarchical view of all accounts associated with your organization, allowing you to easily navigate, view, and manage entities at different levels of your merchant structure.
The Account Tree is designed for high performance and usability, enabling efficient navigation even in large and complex account hierarchies. It remains available throughout the portal to ensure consistent access while performing daily operational tasks.
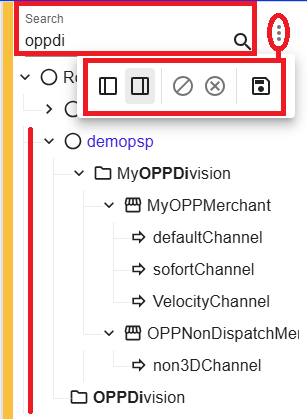
Figure 1: Account Tree with hierarchy, search, and controls
What you can do with the Account Tree
Using the Account Tree, you can:
- Gain a clear overview of parent and child account relationships
- Quickly switch context between different entities
- Access configuration, transaction data, and administrative features for a selected account
- Perform account‑level management actions from a single interface
Layout and Navigation
Upon logging into the Merchant Portal, the Account Tree is displayed by default and remains visible across the portal, allowing quick navigation between entities.
The Account Tree layout is fully customizable:
Resize the Account Tree
You can resize the Account Tree by dragging the vertical bar that separates it from the main content area.
Minimize the Account Tree
The Account Tree can be minimized by clicking the handle icon located in the center of the vertical bar. This allows you to temporarily hide the tree and maximize the main content area.
Change the Docking Position
You can move the Account Tree to either side of the screen by opening the menu in the top‑right corner of the Account Tree and selecting one of the following options:
- Dock to the left
- Dock to the right
Save the Layout
Once the desired position and size are set, the layout can be saved by clicking the Save icon. Your layout preferences are retained for future sessions.
This flexibility allows users to tailor the workspace to their personal workflow and screen layout preferences.
Structure of the Account Tree
The Account Tree is organized as a hierarchy of nodes in a tree model. Each node represents an Entity and corresponds to a specific level within your organizational and processing structure.
The hierarchy is composed of four distinct levels:
-
Organization Level (PSP)
The top level of the Account Tree, representing the overall organization. It serves as the root of the hierarchy and provides visibility across all underlying entities. -
Division Level
Used to logically group and organize lower‑level entities based on business structure or operational needs. -
Suborganization Level (Merchant)
The level where API credentials are created and managed. This level typically defines technical or operational boundaries for integrations and access control. -
Channel Level
The most granular level of the Account Tree. This is where merchant accounts are configured to process transactions and where payment processing activities are executed.
This hierarchical structure enables scalable account management, clear separation of responsibilities, and consistent inheritance of settings across entities.
Account Tree Management
Account Tree management is available from Admin → Account → Entity. From this section, users can view, create, edit, and manage entities depending on their assigned permissions.
View Entity Information
To view information for an entity:
- Select the entity directly from the Account Tree.
- Open the Entity tab to display information related to the selected entity.
The following information is available:
- Entity ID
-
Entity type, such as:
- Organization
- Division
- Suborganization
- Channel
- State (for example, Live, Test, Disabled, Closed)
- Description
- Creation date
Create Entities
To create a new entity:
- Select an existing entity from the Account Tree.
- Select Add.
Depending on the selected entity, the system will create:
- A Division
- A Suborganization
- A Channel
An Add Entity dialog opens, where the following information must be provided:
- Name (mandatory)
- State (mandatory)
- Customer ID – A customer‑defined identifier
- Description (optional, but strongly recommended)
Select Save to create the entity.
Creating Multiple Entities
The Add another checkbox allows you to create multiple entities in sequence. When selected:
- The system prompts you to create another entity
- The new entity is created at the same level as the previous one
Edit Entities
To edit an existing entity:
- Select the entity from the Account Tree.
- Select Edit.
You can modify:
- State
- Description
Select Save to apply the changes. All updates are applied immediately.
Entity States
The following table describes the available entity states:
| State | Description | Transaction Processing | Reversible |
|---|---|---|---|
| Live | Active and intended for live production traffic | Enabled for live transactions | Yes |
| Connector Test | Used for testing outgoing connections to acquirers and APMs | Enabled for test transactions | Yes |
| Integrator Test | Used exclusively for gateway‑merchant testing | Enabled for test transactions | Yes |
| Disabled | Entity and all underlying entities are disabled | Disabled | Yes |
| Closed | Permanently closed and cannot be reactivated | Disabled | No |
Notes:
- Changing the state of an entity affects all entities below it.
- Disabled entities can be re‑enabled.
- Closed entities cannot be reverted.
- Disabled and closed entities can be shown or hidden using the Account Tree options menu.